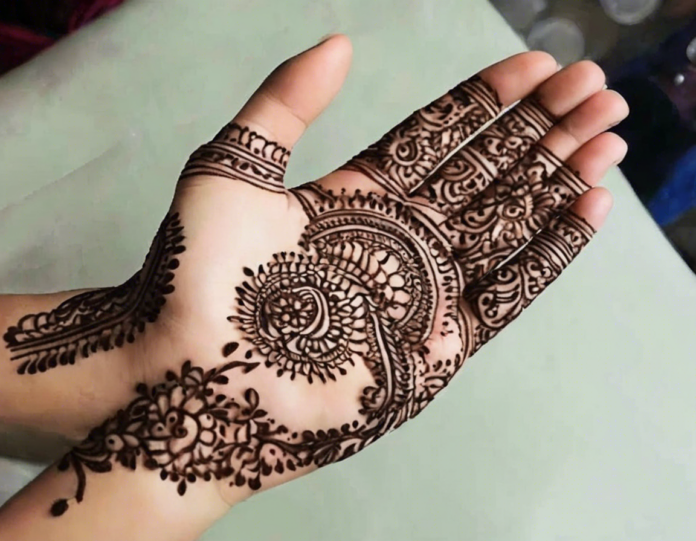
Mehndi, also known as henna, is a traditional form of body art that has been practiced for centuries in various parts of the world, especially in South Asia, the Middle East, and North Africa. It involves applying intricate designs on the skin using a paste made from the leaves of the henna plant. Mehndi is commonly applied during festivals, weddings, and other special occasions as a form of temporary decoration.
For beginners looking to try their hand at mehndi, front hand designs are a great place to start. Front hand designs are relatively easy to create and offer a wide range of possibilities for experimentation and creativity. Whether you’re a complete novice or have some experience with mehndi, the following 10 easy front hand beginner mehndi designs are perfect for those looking to dip their toes into the world of henna art:
1. Simple Floral Design:
- Begin by creating a small flower at the center of the palm.
- Add petals and leaves around the flower to create a simple yet elegant design.
- Fill in empty spaces with small dots or lines for a more detailed look.
2. Peacock Feather Design:
- Start by drawing a long, curved line from the base of the palm towards the fingers.
- Add smaller curved lines to create the feather pattern.
- Decorate the feather with dots, swirls, or additional details to enhance the design.
3. Mandala Design:
- Draw a large circle at the center of the palm.
- Add intricate patterns and geometric shapes within the circle to create a mesmerizing mandala design.
- Extend the design towards the fingers or wrist for a more elaborate look.
4. Arabic Mehndi Design:
- Arabic mehndi designs are known for their bold outlines and shading.
- Start by outlining a simple motif like a flower or vine.
- Fill in the design with crisscross patterns or shading to add depth and dimension.
5. Bridal Mehndi Design:
- Bridal mehndi designs are elaborate and intricate, perfect for special occasions.
- Include motifs like flowers, paisleys, and geometric patterns for a traditional bridal look.
- Leave some empty spaces to create a balance between filled and unfilled areas.
6. Geometric Design:
- Create a series of triangles, squares, or diamonds on the palm and fingers.
- Connect the shapes with lines or dots to form a cohesive geometric pattern.
- Experiment with different shapes and sizes to customize the design to your liking.
7. Henna Bracelet Design:
- Draw a continuous band around the wrist like a bracelet.
- Add intricate patterns or motifs within the band for a more elaborate look.
- Extend the design towards the fingers or forearm for a cohesive henna jewelry look.
8. Leafy Vine Design:
- Start by drawing a vine from the base of the palm towards the fingers.
- Add leaves, flowers, or other motifs along the vine for a botanical look.
- Incorporate swirls or dots to fill in empty spaces and enhance the design.
9. Heart Design:
- Draw a heart shape at the center of the palm or on the back of the hand.
- Decorate the heart with intricate patterns, dots, or shading for a romantic touch.
- Add additional elements like flowers or vines around the heart for a complete design.
10. Tribal Mehndi Design:
- Tribal mehndi designs feature bold, black outlines and geometric shapes.
- Create a series of tribal motifs like arrows, triangles, or swirls on the hand.
- Fill in the designs with solid blocks of henna or shading for a striking look.
Whether you’re looking to practice your mehndi skills, prepare for a special occasion, or simply experiment with a new form of art, these 10 easy front hand beginner mehndi designs offer a range of options to get you started on your henna journey. Remember, practice makes perfect, so don’t be afraid to try different designs, techniques, and patterns to find what works best for you.
Frequently Asked Questions (FAQs) about Beginner Mehndi Designs:
1. How long does it take for mehndi designs to dry?
- Mehndi designs usually take 2-3 hours to dry completely. It is recommended to keep the design untouched during this time to ensure a dark and long-lasting stain.
2. Can I create mehndi designs with colored henna?
- Colored henna may contain harmful chemicals that can cause skin reactions. It is recommended to use natural henna paste made from pure henna leaves for safe and traditional mehndi designs.
3. How can I make my mehndi design last longer?
- To make your mehndi design last longer, avoid contact with water for the first 24 hours after applying. Additionally, you can apply a sugar and lemon juice solution on the dried mehndi to enhance the color and longevity of the stain.
4. Can I practice mehndi designs on paper before applying them to my skin?
- Yes, practicing mehndi designs on paper can help you improve your skills and experiment with different patterns and styles before applying them to your skin. You can use a cone or piping bag filled with henna paste to practice on paper.
5. How do I remove mehndi stains from my skin?
- Mehndi stains typically fade away naturally over 1-2 weeks as the skin exfoliates. To speed up the process, you can rub the stained area with olive oil or coconut oil, or soak it in warm water to help the stain fade faster.
By following these tips and practicing regularly, you can master the art of mehndi and create stunning designs that reflect your creativity and style. Experiment with different patterns, motifs, and techniques to develop your own unique mehndi style and enjoy the beautiful tradition of henna art.
